Wednesday, December 28, 2011

Quick Wedding Album
For my Daughters Fiance's Mother for Chrismas.
Club Scrap kits, Papillon and Raku.
Stampin up ink and paper.


I was in a hurry to get it wrapped so took photos of the pages inside the album.
So have some glare on them.

Wednesday, August 31, 2011

Carnival Magic Digital Page!!


I just love making Digital Scrapbook Pages. I have saved all kinds of Photos of Carnival Magic (from the internet) and then thought I should use the best for a Digital Background for my computer! So its not 12x12 like most scrapbook pages, its 17x11 so it looks good on both my laptop and monitor screens. And I save in the highest resolution. When blogger uploads it, it reduces the resolution a bit.
I used Nautical Expedition - designer series digital paper from Stampin Up. I just love the old sailing ship paper!!
Editing was done with PSE8.

Monday, July 25, 2011

My Craftroom!


This is my work area. 2 Elfa carts with a Countertop between them. The rods and baskets on the wall are from Ikea. The small elfa drawers have small bins in them to hold all the small stuff, like glitter, embossing powder...etc.  The larger bins just seem to catch whatever I toss that way! I really want to get more of the smaller drawers.

This cart is also Ikea (called Alexander rolling cart) its perfect for all things for the Cricut. I can pull the expression to the front and still have room for the mat to come out the back.
The rack up on top is for CDs or DVDs, I keep all my stamps in clear DVD cases so it is perfect for them. I wish I would have bought at least 2 more of them. The peg board is plastic- I have a lot of stuff to hang back up there.


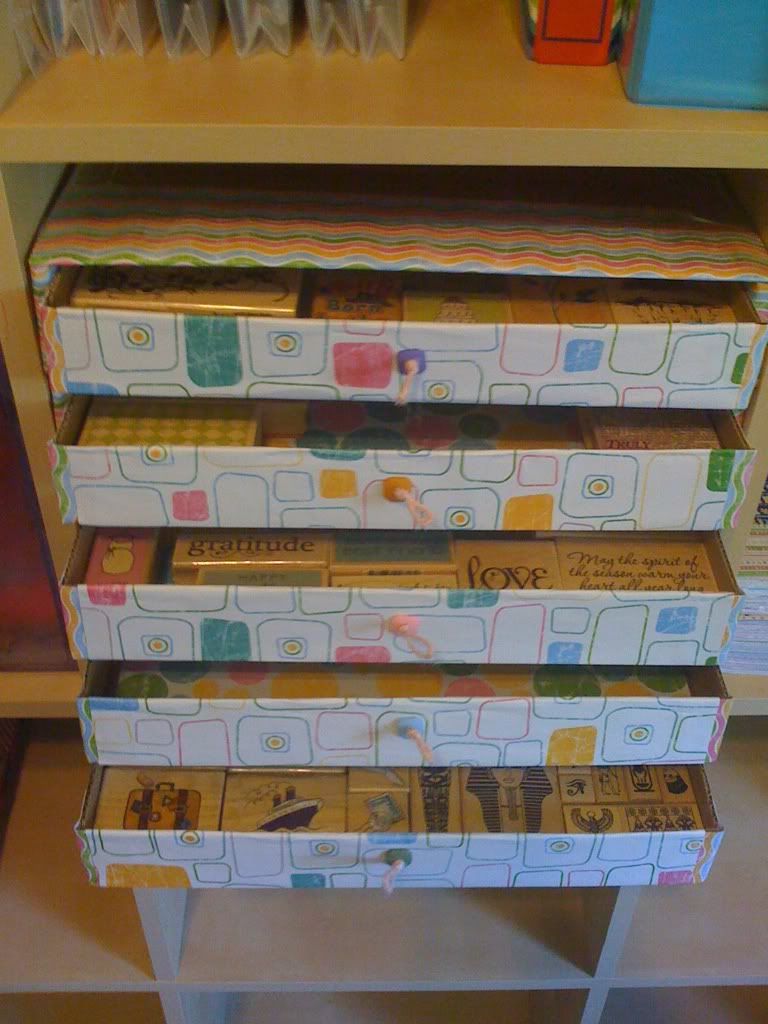
This bookcase is from Ikea. Each shelf is about 13 in wide, 13in high, and 15in deep. So it holds slab paper and albums nicely. I have 2 bins on there but they just seem to collect stuff. I made a pizza box drawer bin to hold all the loose wood stamps.

The taller cart is one of the wire cube things that hold scrapbook paper- I dont really like it- you either have to keep the cover on it or it collects too much dust on the paper! I just keep all the oddball papers on it. The rolling cart with 6 bins is an Iris Cart from Joanns. I just love it!! I can pull the bin out and take to my worktable as needed. Its for all my Stampin Up Papers and stuff.
I had a few extra Ikea racks so I thought this was a good place for them. Since I mostly scrapbook I get sad just stuffing the finished pages into the scrapbooks - so I got some clips and hang them here for a while!! Its good if your scrapbooking an event and you can get the order right before putting them in the scrapbook.

This is where I take my Nap!! Just kidding!! Its for Guests!!! Its an Ikea Futon!


Wednesday, June 29, 2011

Pizza box Stamp Storage!!

I needed a way to store all my Single wood Stamps so I could easily see what I had!! And it needed to fit in my Ikea Shelving unit. This is made with the Pizza boxes that Club Scrap comes in!! I could get 5 of them to fit! Then I covered it with Paper added a drawer pull made with Stampin Up Buttons and Twine. Came out not bad for a first try!!!

Monday, June 20, 2011

Lottery Ticket Holder!

I made this Lottery Ticket holder for a gift, to fit the large scratchoff tickets! Can be used later to store the winners!!
Used Stampin Up Paper, Cricut 'Bags, Tags, Boxes and More' to cut the crayon box(used Design Studio to get the size right) and Cricut 'Printing Press' for the blocks(with colored paper behind cut out letters).

Friday, June 3, 2011

My Laptop Cover!

I wanted to redo my Laptop Cover. Previous one was also a filigree pattern done with vinyl.
I used Green vinyl for the Stems and Yellow for the Flowers.  I used Cricut Expression and Storybook Cartridge (letter R Tulips). I also used Cricut Design Studio.
Now my Laptop does not get alot of wear and tear. Rairly leaves the house. But the last set of vinyl lasted over 2 years and still had some life left - I just wanted a change!

Monday, May 9, 2011

Pond Scrapbook Pages

I call this one "The Frog Princess".
I heard the Frogs out by the Pond singing, so I told the boys to get the flashlights and find them.  This one froze as the flashlight hit it and stayed there the entire time we were out there!! I told the boys it must be a girl, since it liked them so much! That they should give her a kiss in case she was a Princess!!  But no Kisses for that sweet Frog!! Pond is full of Tadpoles, so she must have found her Prince Charming!!


All of these are a Hybred of Paper Kits, Digital Kits, and Photo's. I then Scanned them, before putting in the album.  Mostly Club Scrap "Lotus Pond" Paper and Digital.  These are 8x8 pages.


These Two are of my Pond!
The one below I did not have much room for anything else, so added a Bow to the Ribbon for accent.


All these will go in the "Lotus Pond" Album that came with the senior kit. Good thing I ordered that extra paper!!  Now I need to get around to doing some of the earlier photos of the pond!!

Thursday, March 24, 2011

New blog background graphics!

Let me know what you think!!
Graphics are from Club Scrap -www.clubscrap.com

I think I need to play with my text colors to get them to go with this new background!!

Wednesday, March 2, 2011

Nachi Cocom Scrapbook Page.

Here is my finished Scrapbook Page, from the Beach Photo I posted earlier!! Unforutunatly I was not able to get a photo of myself or my husband in the water!! The Adult kids were having too much Fun and that is what is fun to Photograph!!! I used Club Scrap Castaway Paper and embelishments, Stampin Up ink. edited the beach photo with PSE8!

Tuesday, February 15, 2011


 I wanted to scan my Scrapbook pages to send to the others who were on Vacation with us. This is what I came up with that wont COST me $$$ to have it done.
Using my Old HP Scanner I was able to get 11 3/4 inch scan but only 8 1/2 wide. So I scanned each side and using PSE8 and Photomerge I was able to get this result!! I am SO HAPPY with how it came out!!!
I used Club Scrap Kit "All that Jazz". Stamping Up Markers.
edited to add:
Here is more of the Scanned pages I have done:
http://s279.photobucket.com/albums/kk155/loritxphotos/Vacation/

Friday, January 21, 2011

Nachi Cocom, Cozumel MX

I had fun playing with all the beach photos.
Anyway its easier to scrapbook this one photo than try to get them all on one page.
I will post the scrapbook page when I get it done!

This was easy to do, just crop the people out of the water and remove the background, then layer it on the one background. I really did not work too hard to remove the background to cleanly, since I was putting the people back on a water background of the same color. The only way you can really see the crop marks is if you veiwed it very large!